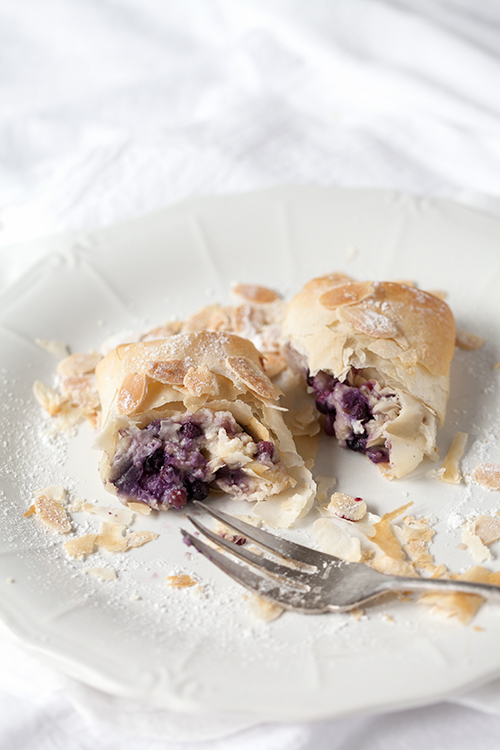
Blueberry and Ricotta Greek Pastries
I just had to make another sweet pastry today, after being deliciously inspired by a Morello cherry and ricotta strudel my dad made for Tony and I over the weekend.
It's not often you will see my dad making something sweet. At least not since his days as an ice cream manufacturer. For many years he has reigned as King of the Main Meals while his wife Julia has always held the title of Dessert Queen in their household. But on Saturday Takis ventured out of his comfort zone with the desire to recreate something he remembers his mother making when he was a boy – a simple, sweet cheese strudel filled with what ever fruit was in season at the time: figs, cherries, grapes, apples, peaches, pears or apricots, and wrapped in fresh, home-made filo pastry.
Home-made filo is something I am dying to make but am just trying to get over the final "it's too hard" hurdle before I take it on. I've always thought making your own filo was one of those things that should be left to the experts. Watching a documentary a few years ago of village ladies stretching the dough over massive marble tables until you could see through it like tissue paper, without a single tear or hole, didn't leave me feeling this was a technique I was going to be mastering any time soon.
Oh, but can you imagine my excitement when recently I came across a new method of rolling and folding the dough, buttering as you go, to create the paper-thin layers, without having to make paper-thin pastry! I plan to experiment with this alternative technique over the coming weeks and am thinking it might be fun (or funny) to share some of my experiences with you here on the blog. Feel free to throw any tips my way, anything to get me over that final home-made filo hurdle!
In the meantime, I am still using commercial filo for my flaky pastry dishes. Here in Australia we are very lucky to have a very good fresh filo product available to us that comes in two thicknesses. Today I am using the thinner filo because that's all I have left in the fridge, but I think a thicker filo might be better suited for this recipe, mainly because the filling expands a little during cooking and the thinner pastry can sometimes tear.
I've chosen to use blueberries in these pastries because this week it's "B for Blueberry" over at Heather's Meatless Monday A–Z challenge. If you haven't heard of MMAZ, it goes a little like this: Each fortnight a new ingredient is introduced that corresponds with the next letter of the alphabet. For the first week of the fortnight participants are asked to create a recipe and in the second week we cook a recipe, preferably chosen from one of the dishes submitted in the first week.
I love the MMAZ concept and am going to try and stick with it for the entire alphabet. The added challenge I've made for myself is that all my dishes need to be Greek! I'm sure there'll be times when I'll struggle to come up with fresh ideas for this challenge so prepare yourselves please because I'll be calling on you guys for help!
For the letter "C" the ingredient is Cabbage and of course I could turn to the classic Greek recipe for stuffed cabbage leaves but would love to create something a bit more original. So please throw me any suggestions for flavour combinations or perhaps even just one other ingredient that you think would pair well with cabbage to create something that would be acceptably Greek. I'd love to hear your thoughts.
Blueberry and Ricotta Greek Pastries
Makes 8
Ingredients
- 400g ricotta cheese
- 1/3 cup castor sugar
- 1 egg, lightly beaten
- 1/4 teaspoon vanilla essence
- 1 teaspoon lemon zest
- 100g blueberries, fresh or frozen
- 8 sheets of filo pastry
- 100g unsalted butter, melted for brushing
- Flaked almonds for sprinkling
- Icing sugar for dusting
Instructions
- Preheat oven to 180 degrees celsius.
- Combine ricotta, sugar, egg, vanilla essence and lemon zest in a bowl and mix well.
- Add the blueberries, stirring until just combined so that you have a two-tone marble effect. Try not to mix the blueberries in too much otherwise the mixture will just become a rather unattractive greyish colour.
- Have your melted butter ready, cut all your pastry sheets in half and place in a pile.
- Take one sheet of pastry and brush with melted butter. Lay another sheet over the first and brush again with butter.
- Place two heaped spoonfuls of the filling at one end of the pastry, roll it up a little, fold the sides in, then continue to roll up, not too tightly, to form a parcel. Flatten the parcel a little and lay seam-side down on a greased baking tray. Repeat for the rest of the pastry sheets and brush the tops of all of them with remaining butter.
- Bake for 20 minutes or until pastry is lightly golden.
To serve, sprinkle with toasted almond flakes and dust with icing sugar.


Comments
Post a Comment